How to Change Do Not Disturb Mode on iPhone
The Do Not Disturb mode on your iPhone is a valuable feature that allows you to silence calls, alerts, and notifications while sleeping, in a meeting, or focusing on a task. It’s a great way to avoid distractions and stay productive. This guide will show you how to change your iPhone’s Do Not Disturb mode and customize it to your preferences.
How to Turn on Do Not Disturb Mode Manually
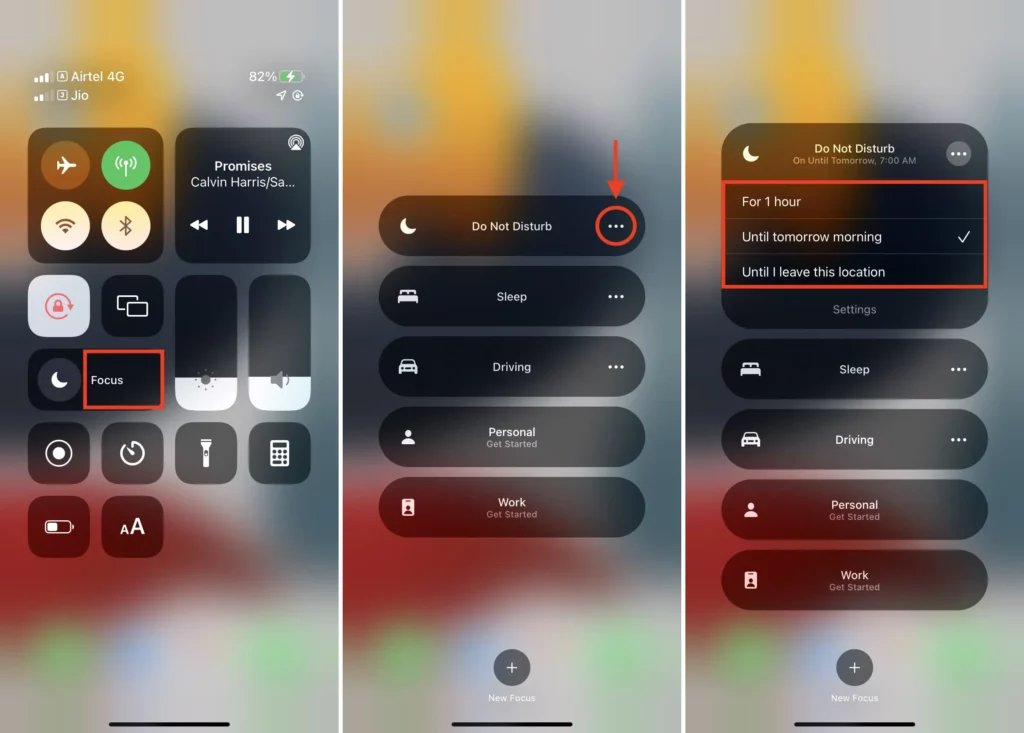
Turn on Do Not Disturb Mode Manually
- To manually turn on your iPhone’s Do Not Disturb mode, swipe up from the bottom of the screen to open the Control Center.
- You’ll see the Do Not Disturb icon (moon shape icon) here. Tap on it to turn on the feature.
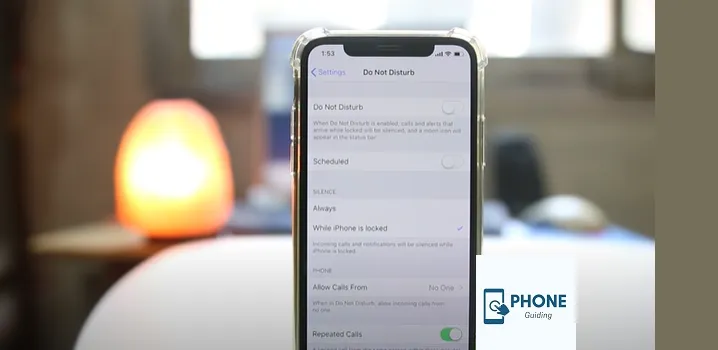
- You can also turn on Do Not Disturb from Settings > Do Not Disturb.
Scheduling Do Not Disturb
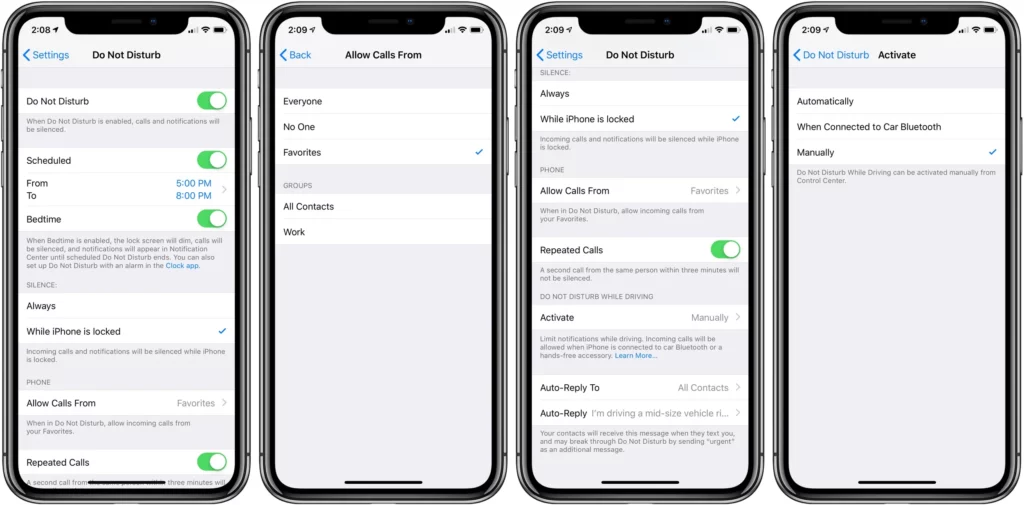
- To schedule Do Not Disturb to turn on and off automatically, go to “Settings” > “Do Not Disturb.”
- Turn on the “Scheduled” toggle switch.
- Here, you can set specific times when the feature will automatically turn on and off.
Customizing Do Not Disturb Settings
- To customize the settings for Do Not Disturb, go to “Settings” > “Do Not Disturb.”
- Here, you can allow calls from certain contacts, enable repeat calls, or set specific end times for Do Not Disturb.
Using Do Not Disturb While Driving
- You can also use the Do Not Disturb feature while driving on your iPhone. Go to “Settings” > “Do Not Disturb” > “Activate.”
- Here, you can turn on the “Do Not Disturb While Driving” feature, automatically turning on Do Not Disturb when your iPhone detects that you’re driving.
Why does my iPhone keep Going on? Does Do Not Disturb?
There are a few reasons why your iPhone may keep going into Do Not Disturb mode:
- Scheduled Do Not Disturb:
- The first reason could be that you have scheduled Do Not Disturb to turn on and off automatically at specific times. To check this, go to “Settings” > “Do Not Disturb” > “Scheduled” and see if the feature is turned on and set to specific times.
- Location-based Do Not Disturb:
- If you have enabled the “Do Not Disturb While Driving” feature, your iPhone may automatically go into Do Not Disturb mode when it detects you’re driving. To check this, go to “Settings” > “Do Not Disturb” > “Activate” > “Do Not Disturb While Driving” and see if it’s turned on.
- Third-party app:
- Another reason could be that a third-party app installed on your iPhone turns on Do Not Disturb mode. Some apps can automatically turn on Do Not Disturb for specific activities or events.
- IPhone malfunction:
- In some rare cases, an iOS bug could be causing your iPhone to turn on the Do Not Disturb mode automatically. Try restarting your iPhone or updating to the latest version of iOS to see if that fixes the problem.
It’s best to check the above reasons to understand the cause of the problem and take the necessary actions accordingly.
How to Turn Off Do Not Disturb On iPhone 12
There are a few ways to turn off Do Not Disturb on an iPhone 12:
- Control Center:
- Swipe down from the top-right corner of the screen to open the Control Center. Tap on the crescent moon icon to turn off Do Not Disturb.
- Settings:
- Open the “Settings” app and tap “Do Not Disturb.” Toggle the switch to the off position.
- Siri:
- You can also turn off Do Not Disturb by asking Siri. Say, “Hey Siri, turn off Do Not Disturb” or “Hey Siri, disable Do Not Disturb.”
- Shortcut:
- If you have set up a shortcut in the Shortcuts app to turn on or off Do Not Disturb, you can use that to toggle the feature.
- Control Center on lock screen:
- You can also turn off Do Not Disturb by going to the Control Center on the lock screen and tapping the crescent moon icon.
Note: If you have scheduled Do Not Disturb to turn on, and off at specific times, you must disable the schedule in the settings to stop Do Not Disturb from coming on automatically.
Use Do Not Disturb with Focus on Your iPhone or iPad
You can use Do Not Disturb with Focus on your iPhone or iPad to help you stay focused on the tasks that matter most. This feature allows you to create custom settings for different times of the day, such as during work hours or when you’re studying. Here’s how to use it:
- Open the “Settings” app on your iPhone or iPad.
- Tap on “Do Not Disturb.”
- Scroll down and tap on “Focus.”
- Select the type of focus you want to create, such as “Work” or “Study.”
- Customize the settings for your focus, such as which apps and contacts can send you notifications.
- Turn on the “Scheduled” toggle to set specific times for your focus.
- Once you’ve set up your focus, you can turn it on and off by tapping the Focus icon in the Control Center or using Siri commands.
With Do Not Disturb with Focus, you can stay focused on the task at hand and reduce distractions, allowing you to be more productive.
Conclusion
The Do Not Disturb mode on your iPhone is a powerful feature that allows you to silence calls, alerts, and notifications when you need to focus or need some peace. If you follow the steps above, it’s easy to change your iPhone’s Do Not Disturb mode and make it work.
FAQs
How do I turn off Do Not Disturb?
To turn off Do Not Disturb, go to the Control Center and tap the Do Not Disturb icon or go to “Settings” > “Do Not Disturb” and toggle the switch to the off position.
How do I allow calls from specific contacts while Do Not Disturb is on?
Go to “Settings” > “Do Not Disturb” > “Allow Calls From” and select the contacts you want to allow calls from.
How do I set specific end times for Do Not Disturb?
Go to “Settings” > “Do Not Disturb” > “Scheduled” and set the specific end time for when Do Not Disturb will turn off.
How do I use Do Not Disturb while driving?
Go to “Settings” > “Do Not Disturb” > “Activate” and turn on the “Do Not Disturb While Driving” feature.
Can I still receive notifications while Do Not Disturb is on?
Yes, you can still receive notifications while Do Not Disturb is on, but they will be silenced and will not make any sounds or vibrations.
